
|
|
Our fast-moving digital world is hard to keep up with. Everywhere we look we try to capture snippets of this world in the form of moving pictures that we call film and video.
Animation is a way of creating film and video from scratch. To animate something is to bring it to life, so here you will learn how to create the illusion of breathing life into in-animate objects from our everyday world. In developing your story telling skills through animation, you will be learning a new language allowing you to communicate and control new digital technologies within new environments. |

|
1. Project: (60%)
Requirements:
|
2. Project Pages (Folio): (20%)
Folio Brief: Your project will need to follow a sequence of development stages and your project pages will document this process. Your combined Project Pages are worth 20% of your final mark and are compiled of homework tasks and classroom activities. At times you will be required to complete the project pages for homework and submit it to your teacher next lesson in order to get the best results you can! 3. Research/WrittenTask: (20%)
Research assignment: Students are to research the unit topic and submit evidence on their findings by answering the questions on the attached research task worksheet.
|


Online Animation Gallery:
|
|
|
|
|
|
|
Student Animation Gallery:
STUDENT AMIMATION SAMPLES from Jolyon Gray on Vimeo.
PROJECT WORK:
BLOCK ONE: IDEAS

|
This first two-week block of study will cover the following topics:
|
|
1. THEME
The theme of your animation will be what keeps people interested in your story. For this project you will need to include the following TWO themes:
Task: Students to present and justify their chosen Dream Olympic activity as a brief written task. |

|


|
2. STORYLINE
Students to look at the keys concepts of Storyline Development, identifying the importance of each element needed in a successful storyline. Study the resources about Story Arcs and learn to identify the key elements within a story arc and better understand what actually happens throughout the telling of a GOOD story. Task:
Students are to develop a BEAT SHEET overview of their story. They are to produce a Story Arc diagram to represent their own chosen theme and the story they will tell (see Cinderella Story Arc for help). |

|


Gallery: Heres some more variations on the concept of Story Arcs and how they can vary depending on the complexity of the story telling.
|
3. CHARACTER DEVELOPMENT
Students to discuss and identify character traits that make film and animation characters memorable, documenting these traits in the form of a brainstorm, chart or list. Students to identify how these traits could be portrayed in their animation as they develop their characters and their scripts within their story development. TASK: Students to watch the video and complete the Character Study Worksheet/Activity below: |
Watch this video to learn about Character Development Rules from PIXAR.
|
|
4. SCRIPT
Discuss the importance of scripts in the production of film and performance arts. Identify the need for concise and well worded delivery that allows a characters personality to develop on screen. TASK: Students are to produce a script for their animation as a word document that shows their characters lines have been carefully developed, focussing on addressing the theme of Humility. NB: This can be hand-written or typed into a word document, as long as you can show your script hs been developed. |

|
|
5. STORYBOARDS
A storyboard is a graphic layout that sequences illustrations and images with the purpose of visually telling a story. A story board is used to communicate how a scene will play out shot by shot and is often used for motion pictures, television, animation, commercials, pre-visualizations or interactive media. Storyboard panels can be comprised of custom drawings, screenshots from comparable videos, or photos taken on location. Storyboards Can Include:
|
Watch this video to learn all about storyboards and why we use them.
|
|
Above: Watch how the original storyboard from ICE AGE II helped animators create the camera and character flow through this scene.
|
Above: Watch how to create your own storyboard, helping you plan the camera and character flow through your scenes.
|
BLOCK ONE SUMMARY WORKSHEET
|
Here's a worksheet and checklist for the first two-week block of study:
|

|
BLOCK TWO: RESOURCES

|
This second two-week block of study will cover the following topics:
|
|
1. CAMERA
Students to learn about the variety of camera options availble for the production of stop-motion animation and how to best utilise these resources and their operational features. Discuss and identify features that would best suit the specific needs for stop-motion animation. Task: Students to gain access to camera equipment and learn how to utilise the photographic features available and begin practice shooting animation stills. Camera Options:
|
|
|
2. TRIPOD
Discuss methods and techniques used in studios for controlling and capturing consistant video and photography using tripods and stabilisation devices. Identify the key elements required for achieving quality results in the home studio and how these could possibly best be achieved using available materials and equipment in the home. Task: Students to make a list of suitable materials available and begin practice shooting animation stills utilising their DIY stabilisation devices. |
|
|
3. STUDIO
Identify the features required for a suitable animation studio area that can be established in the home. Consider the time frame required for shooting and the importance of maintaining consistent studio conditions. Task: Students to make a list of suitable areas in their home and begin trialing these spaces with photographic resources in place. |
|
|
4. SOUND & LIGHTING
Discuss methods and techniques used in studios for controlling and capturing consistant lighting and audio. Identify the key elements required for achieving quality results in the home studio and how these could possibly best be achieved using available materials and equipment in the home. Task: Students to make a list of suitable materials for use within their home and begin practice shooting animation stills utilising their DIY lighing devices. |
|
|
5. PROPS AND SETS
Identify the specific needs for an animation studio stage area that can be produced in the home using available materials, including found object thaat could be used as key characters within the animation. Consider the specific props and scenes that may need to be made so that their story can come to life. Task: Students to make a list of suitable materials and items in their home and begin practice shooting animation stills utilising their props and sets to evaluate suitability. |
|
BLOCK TWO SUMMARY WORKSHEETHere's a worksheet and checklist for the second two-week block of study:
|

|
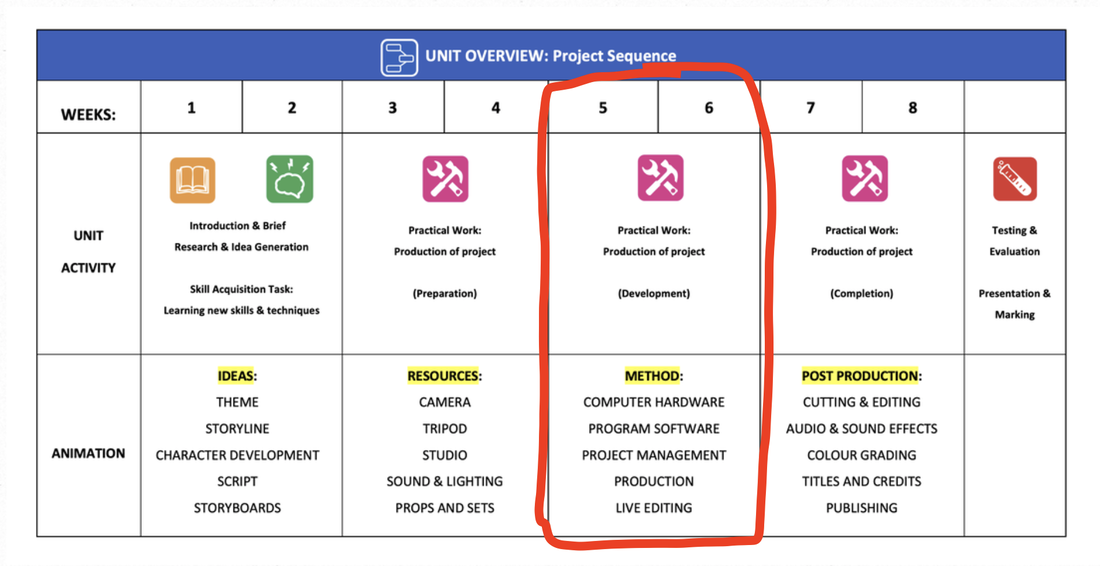
BLOCK THREE: METHOD
|
This third two-week block of study will cover the following topics:
|
|
1. COMPUTER HARDWARE
Discuss the computer hardware requirements for producing a stop-motion animation project at home. Consider the specific features that will affect computer function and performance. The rule is "the right tool for the right task" so be sure your computer is up to the job. Task: Students to make a list of suitable computer options in their home and begin to upgrade and streamline computer performance and evaluate suitability. |

|
|
2. PROGRAM SOFTWARE
Discuss software options available that would be suitable for producuing a stop-motion animation project at home. Identify key features and perormance funtions required for the success of this type of project. PHONE/TABLET SOFTWARE: Stop Motion Studio is a FREE app that you can install on your phone of tablet to capture, compile and edit your animation projects.
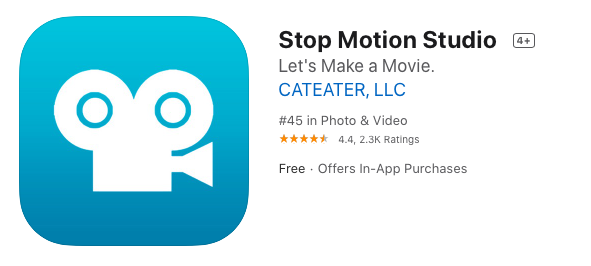
NB: For a few dollars, you can choose to download the PRO paid version for extra features on you phone, tablet or even your laptop!
|
COMPUTER SOFTWARE: Adobe makes software like Photoshop and Illustrator but also produce high-end video editing software. We'll be learning to use Premiere Rush CC
Once you've downloaded the software through you Creative Cloud Account you can get started editing. 
There is a series of short videos available through Adobe support. Click the link to get started learning about Rush...
|
3. PROJECT MANAGEMENT
Using ideas generated from class discussion, formulate a management process for handling, storing and compiling bulk files produced throughout the project. Discuss best filing systems and software management systems abvailable to individual users.
Using ideas generated from class discussion, formulate a management process for handling, storing and compiling bulk files produced throughout the project. Discuss best filing systems and software management systems abvailable to individual users.

Above is the Animation Flow Chart showing the process of producing your animation using Adobe Premiere Rush and publishing to Vimeo.
|
4. PRODUCTION
Using all management resources to date, students are to commence shooting scenes and sequences for their animation in keeping with their storyline development and storyboard layout. |

|
|
5. LIVE EDITING
Students are to compile the raw animation images within their management systems and editing software to constantly analyse (review and assess) the process and streamline the process against their criteria for success (storyboard layout). Task: Students to watch the How To Animate video to learn how to live edit their animation using Adobe Premiere Rush software. |
HOW TO ANIMATE from Jolyon Gray on Vimeo. |
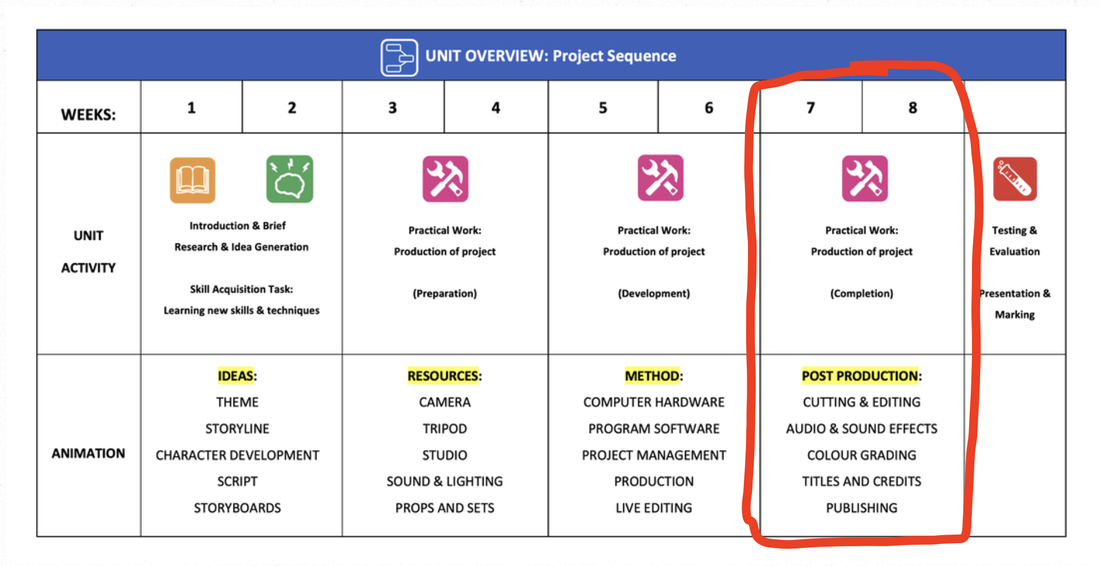
BLOCK FOUR: POST PRODUCTION
|
This fourth (and final) two-week block of study will cover the following topics:
|
|
1. CUTTING & EDITING
Studying storyboard techniques again from existing projects, students are to learn how to edit their final sequences to achieve the desired outcomes as identified in their storyboard layouts. Identify the need to be selctive and choose only sequences that enhance the storyline delivery. Students to use online training resources for Adobe Premiere Rush: |

|
|
2. AUDIO & SOUND EFFECTS
Discuss how the addition of a dialogue track (script) can help convey the storyline. Identify what other methods of script development are available (eg: Prologue (spoken), epilogue (spoken), narration, titles, subtitles). Discuss the best methods for capturing clear and undistorted audio to overlay your dialogue track. Look at options for adding sound effects and a score/soundtrack to enhance the viewing experience of the animation. |

|
|
3. COLOUR GRADING
Discuss how different qualities in lighting and colouration can affect the veiwing experience for an audience. Students learn about applying colour grading filters to anmation sequences to achieve consistency in appearance and create desired outcomes for the final presentation of their work. |
|
|
4. TITLES AND CREDITS
Identify how the storyline of the animation can be more successfully delivered by enhancing methods of script development (eg: Credits, Prologue (written), epilogue (written), titles, subtitles) |
|
5. PUBLISHING
Students to look at various platforms for delivering multimedia content online. Discuss the target market for multimedia projects and the limitations that some social media publishing platforms may have (eg: Snapchat, Instagram) in comparison to more professional content management systems (eg: YouTube, Vimeo).
Students to create a Vimeo account online and upload their final animation video in the highest possible resolution format.
CONCLUSION: SHOWTIME & WHERE TO FROM HERE?

|
SHOWTIME:
Now is the fun part where you get to show your animation to your classmates, friends and families. Make a big deal of it and invite people to your online premiere screening. It's also a good chance to take in some feedback from your teacher, friends and family on what you did well and how you might improve upon your animation next time around. WHERE TO FROM HERE?
There are hundreds of websites and videos available to help you learn more if you want to take your animation even further. Explore and see what you can find. Heres a great stating point... |
